Why RTX AI Video Generation Changes Everything
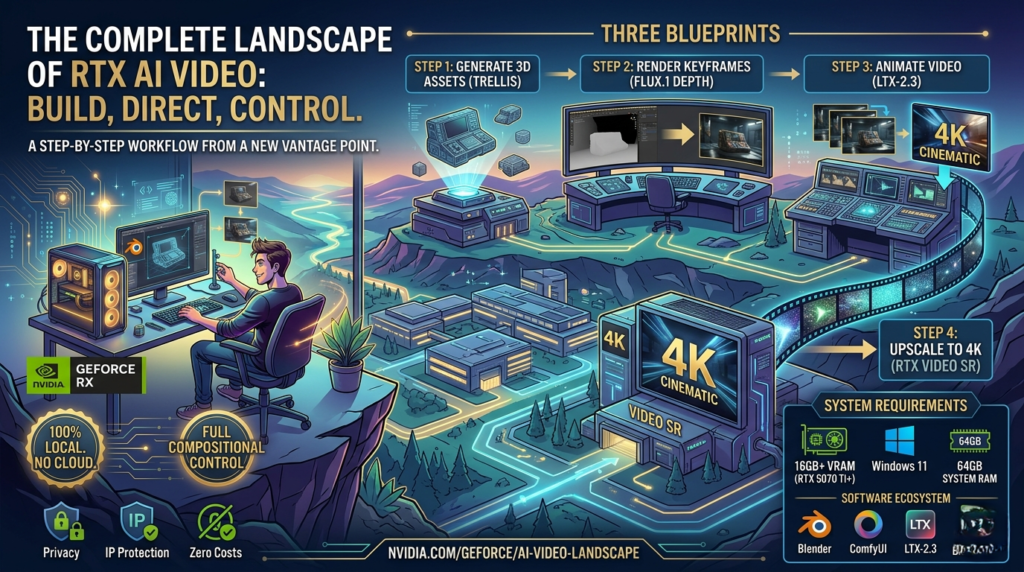
RTX AI video generation has crossed a threshold that would have seemed impossible just two years ago — you can now produce cinematic, 4K AI video clips with full control over composition, camera angle, and subject motion, entirely on a consumer GPU sitting on your desk.
If you’ve been frustrated by text-to-video tools that spit out unpredictable results you can’t steer, you already understand the problem. Prompt-only approaches hand the wheel to the model. You get something interesting. You rarely get what you envisioned.
NVIDIA’s new workflow for RTX AI video generation flips that dynamic. Instead of hoping a text prompt translates correctly into visuals, you build a 3D scene in Blender, define your start and end frames with photorealistic AI imagery, and then let LTX-2.3 animate the in-between. The result is a high-resolution, AI-generated clip that obeys your composition — not the other way around.
This guide walks you through the complete pipeline, step by step, so you can start producing your own 4K AI-generated videos today.
💡 New to ComfyUI? Before diving into this guide, it’s worth getting familiar with ComfyUI basics. Check out our internal guide: Getting Started with Visual Generative AI on RTX PCs → (internal link placeholder)
What You Need Before You Start
Before beginning your RTX AI video generation workflow, make sure your system meets the minimum requirements. This pipeline runs entirely locally — no cloud subscription needed.
System Requirements:
- GPU: 16GB of VRAM minimum (NVIDIA GeForce RTX 5070 Ti or higher recommended)
- OS: Windows 11
- System RAM: 64GB
Software You’ll Need:
- Blender 4.2 / 4.5 LTS – for 3D scene layout and depth-map-guided image generation
- ComfyUI – the node-based workflow engine that drives image and video generation
- NVIDIA 3D Object Generator Blueprint – uses Llama 3.1 8B, NVIDIA SANA, and Microsoft TRELLIS
- NVIDIA 3D Guided Generative AI Blueprint – uses FLUX.1 Depth for composition-aware image generation
- LTX-2.3 (from Lightricks) – the video model that animates between your keyframes
- RTX Video Super Resolution Node – installs via ComfyUI Manager to upscale output to 4K
This setup requires no monthly fee, no cloud credits, and no data leaving your machine — a massive advantage for creative professionals working with proprietary content.:RTX AI video generation
The 3-Blueprint Pipeline Explained
The NVIDIA RTX AI video generation workflow is organized into three modular blueprints. You can use them independently or chain them together for a full pipeline.
| Blueprint / Workflow | Purpose | Key Models Used |
|---|---|---|
| 3D Object Generator Blueprint | Generate 3D assets from text descriptions | Llama 3.1 8B, NVIDIA SANA, Microsoft TRELLIS |
| 3D Guided Generative AI Blueprint | Turn Blender scene depth maps into photorealistic images | FLUX.1 Depth (NVFP4 accelerated on RTX) |
| LTX-2.3 FirstFrame/LastFrame ComfyUI Template | Animate between keyframes + upscale output to 4K | LTX-2.3 (Lightricks), RTX Video Super Resolution |
Each blueprint is modular. If you already have 3D assets from another source — or prefer to model your own props in Blender — you can skip the first blueprint entirely and jump straight to image generation.
🔗 See also: How NVIDIA DLSS 4 Accelerates AI Workloads on RTX GPUs → (internal link placeholder)
Step 1 – Generate Your 3D Scene Assets
The first step in any strong RTX AI video generation workflow is controlling your visual composition. That starts with 3D assets.
Set up the 3D Object Generator Blueprint by following the GitHub instructions at NVIDIA-AI-Blueprints/3d-object-generation. Once running, open your browser and visit http://127.0.0.1:7860.
Generating Assets with TRELLIS
Type a plain-language description of the props you need. The TRELLIS model interprets your description, generates a 3D mesh with textures, and gives you multiple previews to choose from.RTX AI video generation
Run the generator multiple times to build a library of options — you’ll want variety when composing your scene. A single prompt like “spaceship bridge control panel” can produce a range of stylistically distinct models that you can mix and match.
Pro tips for better TRELLIS outputs:
- Use a 1:1 aspect ratio reference image if providing one
- Make sure the background is plain or removed before feeding into TRELLIS
- Avoid images with strong directional shadows — they bake incorrectly into surface normals
- Increase Sparse Structure Sampling Steps for cleaner geometry
- Increase Latent Sampling Steps for better surface detail and texture quality
Once you have your assets, bring them all into a single folder. Then open the sample Blender file included with the Blueprint (Documents >> Blender, select the MotorCycle_FF_LF.blend file), clear the existing props, and use the Asset Importer Add-on to pull your new assets in bulk. Apply a 10x scale factor — TRELLIS objects tend to import small.:RTX AI video generation
The layout you establish here is the foundation of your video. Camera angle, scene depth, and subject position will carry through directly into your final output.
Step 2 – Create Your First Keyframe with Blender + FLUX.1
This is where RTX AI video generation starts feeling genuinely powerful.
With your scene set up in Blender, you’ll use the ComfyUI Blender AI Node add-on to generate a photorealistic first frame directly from your 3D viewport. The process uses FLUX.1 Depth — a depth-conditioned image model accelerated by NVFP4 on RTX — to convert your Blender scene into a cinematic image that respects your exact layout.:RTX AI video generation
Setting Up the ComfyUI Blender Add-On
Before pressing Launch/Connect, verify that these ComfyUI nodes are correctly populated in both the first and last frame graphs:
- UNET Loader →
unet Name - DualCLIPLoader →
clip_name1,clip_name2 - KSampler →
sampler_name,scheduler
Once configured, press the red “Launch/Connect to ComfyUI” button and wait 30–60 seconds for ComfyUI to load in the background.:RTX AI video generation
Generating the First Frame
Position your Blender camera at your desired opening shot, then write a prompt that describes the visual mood, style, and subject. Keep iterating — each run takes seconds on an RTX GPU. The add-on generates a depth map from your Blender scene (a grayscale image encoding spatial distance from the camera) and feeds it along with your prompt into FLUX.1 Depth to produce a photorealistic result.
What the depth map does: It acts as an invisible layout guide for the AI. Objects close to the camera render in light gray; distant objects render dark. FLUX.1 uses that structure to position everything correctly, so your AI-generated image matches your 3D scene almost exactly — without any manual compositing.
Refine until the composition looks right. This image becomes your first keyframe.
💡 Tip: SANA, used for quick asset previews, is optimized at 1024×1024. Use 512 or 768 for faster iteration cycles during early layout work.
Step 3 – Generate Your Last Keyframe
With your opening shot established, it’s time to define where the video ends.
Your last frame determines the motion arc of the AI-generated clip. For animated Blender scenes, simply scrub your timeline to the intended end point. For static scenes, position a second camera or move objects to their final positions.:RTX AI video generation
How to Set Up Your Last Frame
Make three changes in Blender:
- Switch the 3D Guided Add-on top menu to Last Frame and write a new text prompt describing the ending composition
- Change the ComfyUI window top menu to Last Frame
- Edit the output file name to clearly distinguish it from your first frame
Press Run. The add-on generates a fresh depth map from your new camera position and renders a matching photorealistic image using FLUX.1 Depth.
The gap between your two frames defines the implied motion. A subtle camera push? A character crossing the room? A crane shot rising over a miniature cityscape? LTX-2.3 will interpret the visual difference and synthesize a coherent animation between them.:RTX AI video generation
Keep both keyframes saved in the same folder and clearly labeled — you’ll load them directly into ComfyUI in the next step.:RTX AI video generation
Step 4 – Turn Keyframes into Video with LTX-2.3
This is the core engine of the RTX AI video generation workflow: taking your two photorealistic keyframes and animating the transition between them.
Open ComfyUI and navigate to the template browser. Search for “LTX” and select the FirstFrame/LastFrame template. Load your saved first and last frame images into the corresponding input nodes.
Writing an Effective LTX-2.3 Video Prompt
LTX-2.3 expects natural language, not tag lists. Your keyframes already contain the visual information — your prompt should describe what happens, not what things look like.
A reliable prompt structure:
- Shot framing — “medium close-up, slight upward tilt”
- Lighting — “high-contrast studio lighting, golden hour”
- Action as a time sequence — describe the motion from first frame to last
- Tone and quality words — front-load these before subject nouns
Aim for 4–6 sentences. Describe the change, not the static state. If your first frame already shows a character standing at a console, don’t describe the console again — describe what the character does.
Example prompt from NVIDIA’s official workflow:
“Cinematic 1960s Supermarionation style. Two marionette pilots operate a retro cockpit… The camera performs a steady forward dolly-in, passing between the pilots to the front windows…”
LTX-2.3 Settings Reference
| Setting | Iteration Work | Final Quality |
|---|---|---|
| Steps | 20–30 | 40+ |
| Guidance Scale (CFG) | 3.0–3.5 | 3.0–3.5 |
| Resolution | 1280×704 | 1920×1088 |
| Max Frame Count | 257 frames (for coherence) | 121 frames (5 sec, best adherence) |
⚠️ Important: LTX-2.3 requires pixel dimensions divisible by 32. That’s why resolutions like 704 and 1088 are used instead of standard values.
About Negative Prompts: LTX-2.3 doesn’t strictly require a negative prompt, but a short, focused one can help. A reliable starting point: morphing, distortion, warping, flicker, jitter, blur, artifacts, glitch, overexposure, watermark, text, subtitles. Keep lists short — long negative prompts rarely help.
Step 5 – Upscale to 4K with RTX Video Super Resolution
Your RTX AI video generation pipeline doesn’t end at 1080p. NVIDIA’s new RTX Video Super Resolution node for ComfyUI lets you upscale your output to 4K in seconds — available on all RTX GPUs.
Installing and Connecting the Node
- Open ComfyUI Manager and search for
RTX - Install the RTX Video Super Resolution node
- In your node graph, connect the VAE Decode IMAGE output to the RTX Video Images In
- Connect the RTX Video upscale_images output to the Create Video images In
Upscale Factor Guide
| Input Resolution | Recommended Upscale Factor | Output Resolution |
|---|---|---|
| 1280×720 | 3x | ~4K (3840×2160) |
| 1920×1088 | 2x | ~4K (3840×2176) |
Quality Setting: Stay on ULTRA unless you need maximum speed. The model is compact, installs quickly, and runs efficiently even on mid-range RTX hardware.
Once this step is complete, you have a fully 4K AI-generated video — built from a text description, shaped by a 3D scene layout, animated by a video model, and sharpened by AI upscaling. All done locally, all on your RTX GPU.
Pro Tips: Prompting, Settings & Troubleshooting
Even with a solid RTX AI video generation pipeline, you’ll hit edge cases. Here are the most common issues and how to solve them.
Black Output Video
Check three things in order:
- Frame count must follow the
(N×8)+1rule. Valid values: 49, 65, 97, 121, 257… - If using a FirstFrame/LastFrame workflow, make sure you’ve added LTXVCropGuides before the VAE decode node. Without it, guide frames corrupt the decode and produce black output.
- Confirm your text encoder (Gemma) loaded correctly — a missing encoder means no conditioning signal, resulting in black or near-black frames.
Last Frame Doesn’t Match Your Image
- Raise the last-frame strength value to 1.0 in your guide node
- Try setting the last-frame position index to -12 instead of -1 — this gives the model a few landing frames before the end
- Keep sequences to 5 seconds (121 frames) — end-frame adherence degrades significantly on longer clips
Subject Appearance Changes Mid-Video
Subject drift is a model limitation, not a bug. Mitigations:
- Keep clips to 5 seconds maximum
- Describe one clear motion at a time in your prompt
- Reduce CFG to 3.0–3.5
- For repeating characters across generations, train a LoRA on that subject — this significantly improves consistency
RTX Video Super Resolution Configuration
- Set Upscale Factor based on your input: 3x for 720p → 4K; 2x for 1080p → 4K
- Set Quality Level to 4 for maximum edge sharpening and artifact removal
RTX AI Video Generation vs. Text-Only Tools: A Comparison
| Feature | RTX AI Video Generation (This Guide) | Text-Only Video Tools |
|---|---|---|
| Compositional control | ✅ Full — via 3D scene and depth maps | ❌ Limited — model decides |
| Camera angle precision | ✅ Defined in Blender | ❌ Approximated from prompts |
| Subject consistency | ✅ Controlled via keyframe images | ⚠️ Inconsistent across clips |
| Output resolution | ✅ Up to 4K via RTX Video SR | ⚠️ Often capped at 720p–1080p |
| Runs locally / offline | ✅ Fully local on RTX GPU | ❌ Cloud-based, subscription required |
| Privacy / IP protection | ✅ Data stays on your machine | ❌ Data sent to remote servers |
| Cost | ✅ One-time hardware cost | ❌ Ongoing subscription fees |
| Learning curve | ⚠️ Moderate (Blender + ComfyUI) | ✅ Low (type and generate) |
| Creative ceiling | ✅ Very high | ⚠️ Limited by prompt interpretation |
The trade-off is clear: text-only tools are faster to start, but RTX AI video generation gives you a creative ceiling that commercial tools simply can’t match — especially for professional, repeatable, or proprietary content.
Frequently Asked Questions
What RTX GPU do I need for this workflow? The minimum requirement is 16GB of VRAM. NVIDIA recommends the GeForce RTX 5070 Ti or higher for the full pipeline at quality settings. Lower VRAM GPUs may struggle with simultaneous model loading across all three blueprints.
Can I use this for commercial projects? The 3D Guided Blueprint uses FLUX.1 Depth, which is licensed for non-commercial use in this configuration. For commercial projects, contact Black Forest Labs directly for a commercial license. LTX-2.3 and TRELLIS have their own respective licenses — always verify before monetizing.
Can I replace FLUX.1 with a different image model? Yes. In the Load Model node, swap FLUX.1-dev for any compatible model such as SDXL for faster iteration. The ComfyUI graph also exposes additional conditioning options including positive/negative prompts and Wildcards for automated variation — useful for cycling through lighting styles in bulk.
Why does LTX-2.3 use unusual resolutions like 704 and 1088? LTX-2.3 requires pixel dimensions divisible by 32. Standard resolutions like 720 and 1080 don’t satisfy this requirement, which is why NVIDIA’s recommended values are 704 and 1088 respectively.
How do I learn more about prompting for LTX-2.3? Lightricks has published a detailed prompting guide specifically for LTX-2 on their blog. You can find it at ltx.io. It covers tone words, motion descriptions, and CFG tuning in depth.
Final Thoughts
RTX AI video generation has arrived at a genuinely exciting inflection point. The pipeline described in this guide — 3D asset generation, depth-conditioned image rendering, keyframe-driven video synthesis, and AI upscaling — represents something qualitatively different from the prompt-and-pray approach of most AI video tools.:ComfyUI video generation workflow
The result is a workflow where you stay in creative control. The camera goes where you point it. The subject starts and ends where you placed them. The style and lighting reflect your artistic choices, not an algorithm’s best guess.:LTX-2.3 first and last frame
The barrier to entry is real: you need capable RTX hardware, patience to learn Blender and ComfyUI, and time to iterate. But for creators who want to produce original, high-resolution, professionally composed video content without cloud costs or subscription lock-in, this workflow is worth mastering.:RTX Video Super Resolution upscaling
As models improve and the tooling matures, the gap between what’s possible in a professional studio and what’s achievable on a local RTX GPU will only continue to narrow.:AI video generation on RTX GPU
For the latest updates on RTX AI tools and generative AI workflows, bookmark NVIDIA’s GeForce News and follow NVIDIA’s GitHub for blueprint updates.